
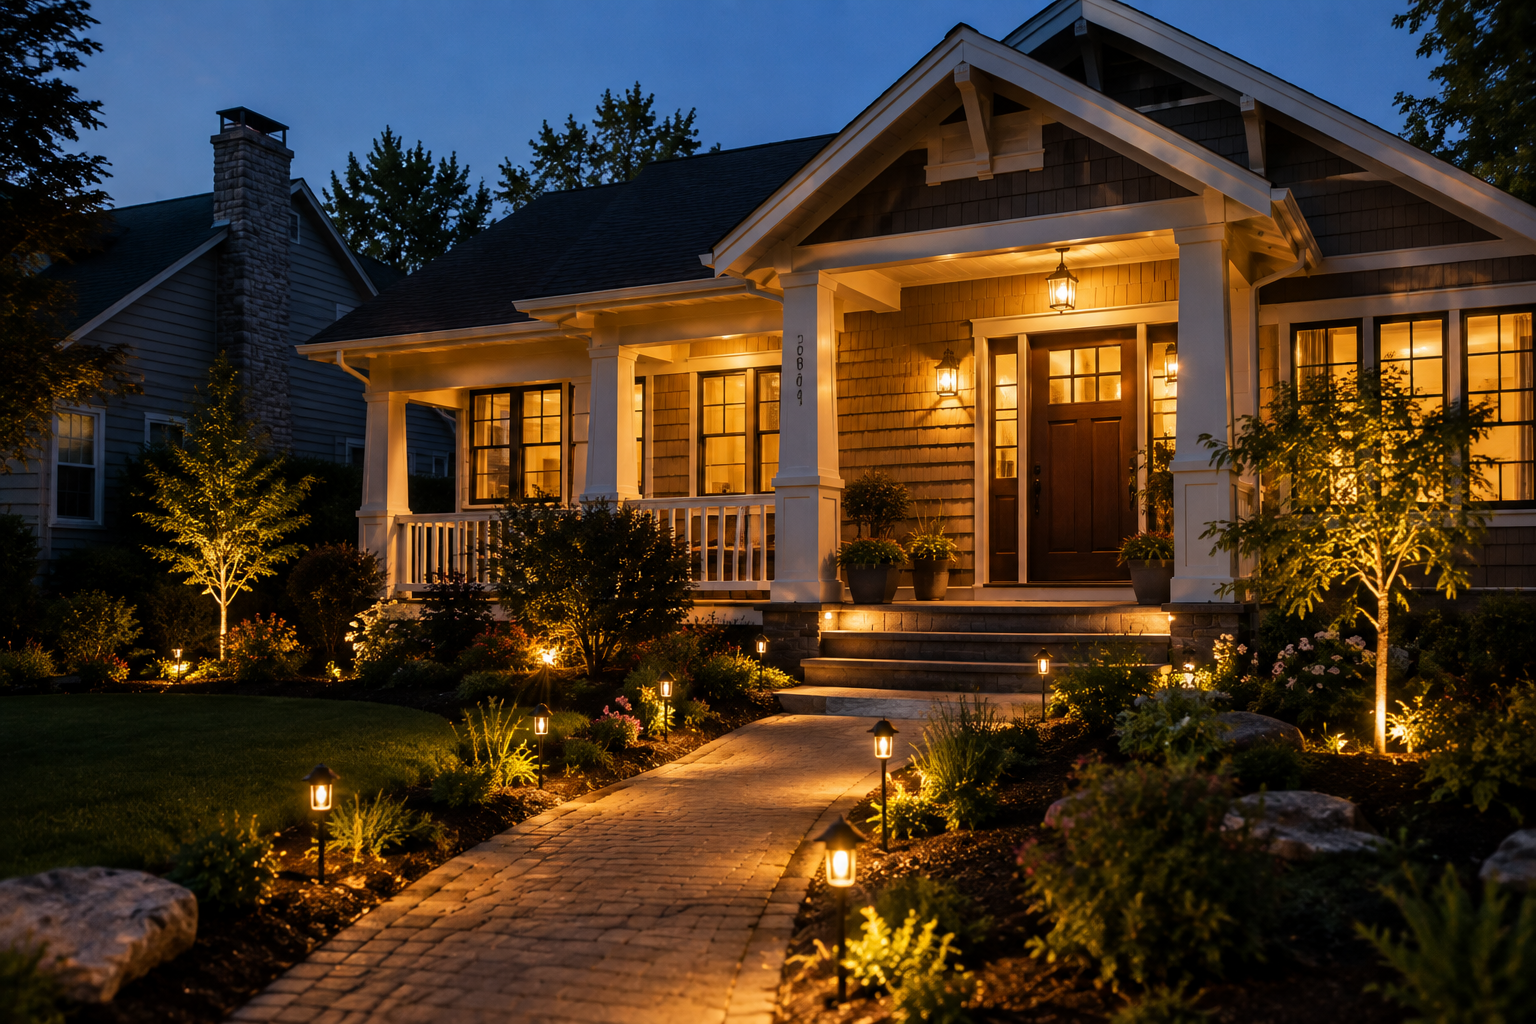
The Complete Guide Every U.S. Homeowner
Let me be honest with you. I’ve walked past a lot of homes at night that looked absolutely beautiful during the day — great siding, fresh paint, new door — and looked like a dark, forgotten building after sunset. No lighting. Or worse, one yellowy coach light that barely lit the porch.
That’s a real shame, because exterior home lighting is genuinely one of the highest-impact upgrades you can make to your home. It costs less than new siding. It takes a weekend to do properly. And the difference it makes after dark is honestly kind of dramatic.
In this guide, I’m going to walk you through every type of exterior lighting worth knowing about — what it does, where it goes, what it costs in the U.S. in 2025, and how to do it right. Whether you’re in the middle of a full exterior home remodel or just trying to give your house a quick upgrade, there’s something here for you.
Who this is for: U.S. homeowners planning an exterior home renovation, anyone doing a home exterior upgrade, or anyone who simply wants their house to stop looking invisible after 7 PM.
1.Why Exterior Home Lighting Matters More Than You Think:-

Here’s something most homeowners don’t consider: the majority of the people who see your home see it at night. Your neighbors driving home from work. Guests arriving for dinner. A buyer doing a drive-by before scheduling a showing.
It Does Three Jobs At Once
Good exterior lighting isn’t just decorative. It handles three real jobs simultaneously:
• Safety — It lights paths, steps, and entries so nobody trips or stumbles coming to your door.
• Security — A well-lit exterior removes hiding spots and deters the kind of opportunistic break-ins that happen in darkness. Motion-activated lighting is especially effective here.
• Curb appeal — This is the part most people underestimate. Strategic exterior lighting makes your landscaping, architecture, and facade look genuinely beautiful at night. Some homes look better lit than they do in daylight.
When you think about it through that lens — safety, security, and beauty all in one — the investment starts to look very different. You’re not buying light bulbs. You’re buying peace of mind and a whole second version of your home’s curb appeal.
The ROI is Real
Exterior lighting consistently shows up in real estate surveys as one of the features buyers notice and respond to positively. It signals that the homeowner cares about the property. It photographs well for listings. And in neighborhoods where most homes go dark after sunset, a well-lit home genuinely stands out.
You don’t need to spend a fortune either. I’ve seen homeowners spend $400 on a few good fixtures and path lights and completely transform how their home looks at night. That’s a better return per dollar than almost any other exterior home upgrade I can think of.
2.Every Type of Exterior Home Lighting — Explained Simply
Before you buy a single fixture, understand what the different types of exterior lighting actually do and where they belong. Using the wrong type in the wrong spot is the most common mistake homeowners make.
1. Entry and Porch Lighting:-

This is the most visible lighting on your home — and the most impactful. Entry lighting frames your front door and defines the face of your house. Done right, it makes your home look welcoming, well-designed, and intentional. Done wrong, it looks like an afterthought.
The most common setup: two wall sconces, one on each side of the front door. The scale of the sconces matters a lot. They should be roughly one-third the height of your door. So if your door is 80 inches tall, your sconces should be around 26 to 28 inches. Most homeowners hang fixtures that are too small — it’s an easy mistake and it makes the whole entry feel underdressed.
If your entry has a deep porch or a portico, consider adding a pendant or lantern centered above the door in addition to the side sconces. That layered look — sconces plus overhead — is what you see on the homes that always seem to look expensive.
Quick win: Even if you change nothing else, replace your current entry fixture with one that’s properly scaled and in a finish that matches your door hardware. This single change costs $80 to $250 and makes a noticeable difference.
2. Path and Walkway Lighting

Path lighting lines your walkway from the driveway or street to your front door. It serves a functional purpose — guiding people safely after dark — but it also creates a genuinely beautiful effect when done well.
Low-profile bollard lights or in-ground path lights spaced 6 to 8 feet apart on alternating sides of the path is the standard approach. You don’t want them too close together. When path lights are spaced too tightly, the effect looks like a runway, not a residential walkway.
Solar path lights have improved dramatically. In most U.S. climates, a good quality solar path light (not the $5 clearance kind — the $25 to $40 kind) holds a charge and gives adequate light throughout the evening. If you’re in the Pacific Northwest or somewhere with limited winter sun, hardwired low-voltage path lights will serve you better
3. Uplighting and Landscape Lighting

Uplighting is what separates a nice home from a stunning one after dark. You place ground-mounted fixtures — either spike lights driven into the soil or surface-mounted bullet lights — and aim them upward at trees, shrubs, architectural features, or the facade of the house itself.
Done well, it creates depth, drama, and a sense of a professionally designed property. Done poorly (too many lights, aimed at the wrong things, wrong color temperature), it looks garish.
A few rules that actually work in practice:
• Uplight your best trees. One or two large trees flanking your home, lit from below with warm white light, create an enormous amount of visual impact.
• Uplight architectural features sparingly. Columns, stone chimneys, or a distinctive gable — one or two focal points, not everything at once.
• Keep the color temperature consistent. More on this below, but 2700K to 3000K is warm and residential. Anything bluer than 4000K looks cold and commercial.
• Use dimmer-compatible fixtures so you can dial back intensity if needed.
4. Garage and Driveway Lighting

The garage takes up a huge amount of visual real estate on most American homes — especially if it’s a front-facing two-car or three-car garage. Yet most homeowners completely ignore it when they think about exterior lighting.
At minimum, mount wall sconces or lanterns on both sides of the garage door, matching the style and finish of your entry lights. That visual consistency — matching fixtures from the entry to the garage — is what makes the front of a house look designed rather than assembled over time.
If you have a long driveway, consider adding driveway markers or low bollards along the edge. Not only does it look polished, it prevents guests from driving off the edge of your driveway in the dark.
5. Motion-Activated Security Lighting

Motion-activated flood lights have a reputation for being ugly — that blinding halogen setup from 1995 that would snap on at the slightest movement and turn your backyard into a stadium. Modern motion-activated lighting is a lot better.
Today’s motion flood lights come in styles that actually look decent mounted to your home. They activate on motion, stay on for a set period (usually 1 to 5 minutes, adjustable), and then shut off. They’re an effective deterrent against opportunistic crime and a practical tool for lighting areas like side gates, back entrances, and garages where you need light occasionally but not continuously.
For areas where you want both aesthetics and security — like the backyard patio — consider dual-mode fixtures that stay at a low ambient level continuously and brighten fully when motion is detected. These give you the best of both worlds.
6. Step and Stair Lighting
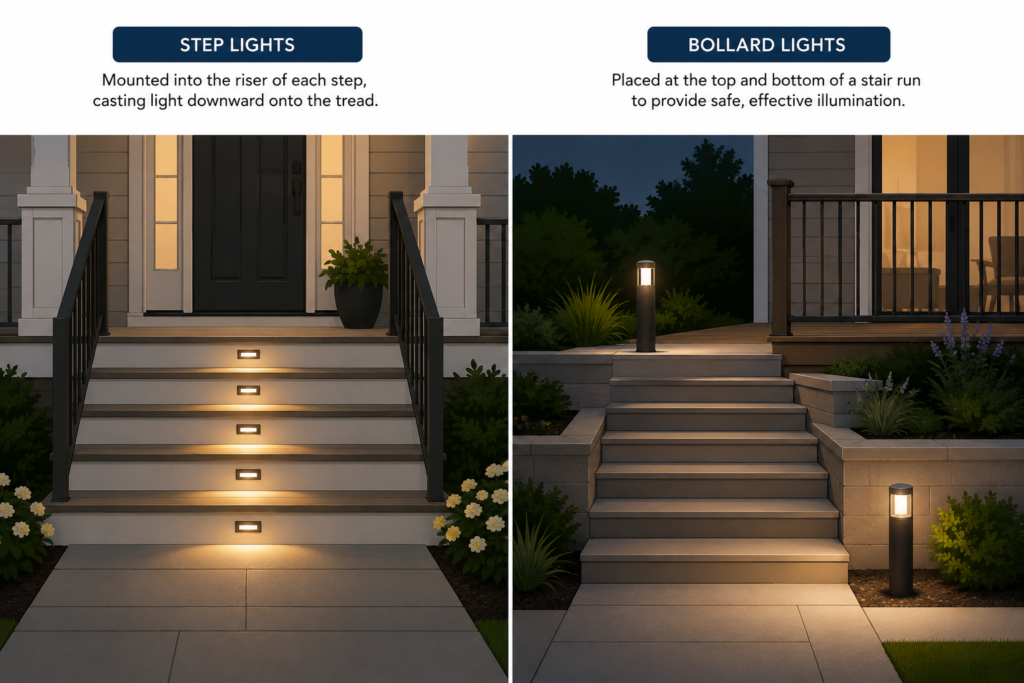
If your home has any exterior steps — front porch steps, retaining wall steps, deck stairs — they need lighting. This isn’t a style preference; it’s a safety issue. Unlit exterior steps are a genuine hazard, especially for older guests and in wet or icy conditions.
Step lights are small, low-profile fixtures that mount directly into the riser of each step, casting light downward onto the tread. They’re subtle, they look clean, and they solve the problem completely. Alternatively, small bollard lights placed at the top and bottom of a stair run can provide adequate illumination without step-mounted fixtures.
7. String Lights and Accent Lighting
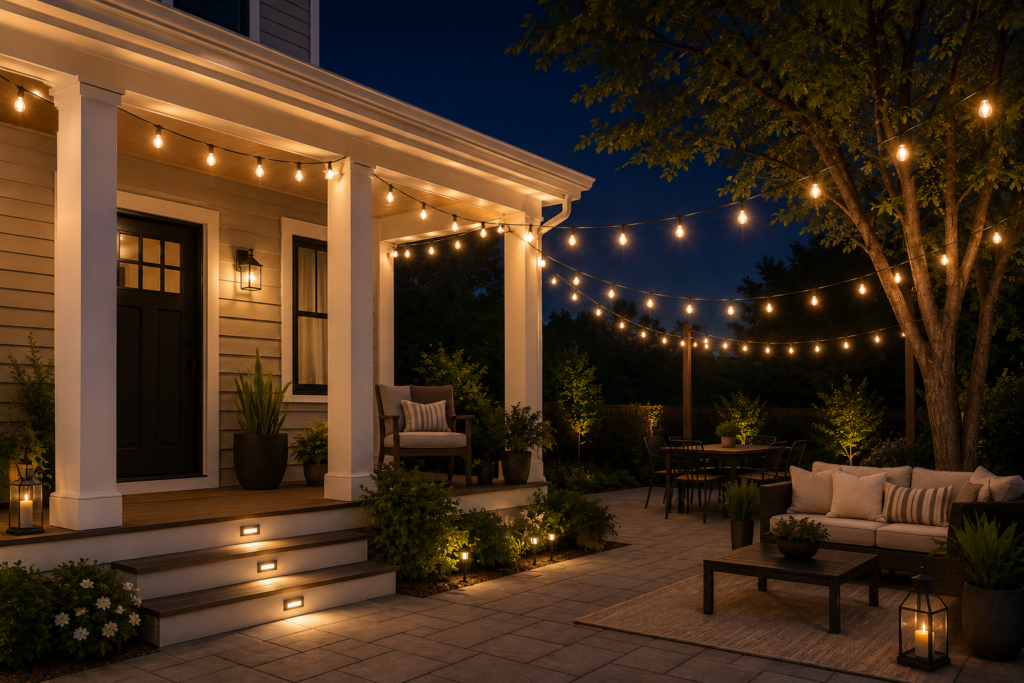
String lights have become genuinely popular on front porches and back patios over the last several years, and honestly, they work. Warm Edison-style string lights stretched across a covered porch or draped through patio trees create an inviting, relaxed atmosphere that’s different from any other type of exterior lighting.
They’re not a substitute for functional lighting — you still need your path lights and entry sconces — but as an additional layer of atmosphere on an outdoor living space, they’re hard to beat for the cost.
3.The Stuff Nobody Talks About — Color Temperature, Lumens & Finish

The Stuff Nobody Talks About — Color Temperature, Lumens & Finish
This is the section where most exterior lighting guides skip the important details. I’m not going to do that. These three things — color temperature, lumen output, and fixture finish — determine whether your exterior lighting looks beautiful or just… fine.
Color Temperature: Get This Right First
Color temperature is measured in Kelvins (K). Lower numbers are warmer (more yellow-orange). Higher numbers are cooler (more blue-white). For residential exterior lighting in the U.S., you want to stay in a specific range.
Color Temperature Guide for Exterior Home Lighting
| Color Temp | Appearance | Best Use |
| 2200K – 2700K | Warm amber/gold | Entry sconces, path lights, string lights |
| 2700K – 3000K | Warm white | General exterior lighting — the residential sweet spot |
| 3000K – 3500K | Neutral white | Garage, security areas, driveways |
| 4000K+ | Cool/bluish white | Commercial — avoid on residential homes |
The most common mistake I see on new exterior lighting installs: mixing color temperatures. Someone buys 3000K sconces for the entry, 4000K floodlights for the garage, and 2700K path lights for the walkway. From the street, the house looks like it has three different personalities. Pick one temperature — 2700K or 3000K is the safe choice — and stay consistent across every fixture.
Lumens: How Bright Is Bright Enough?
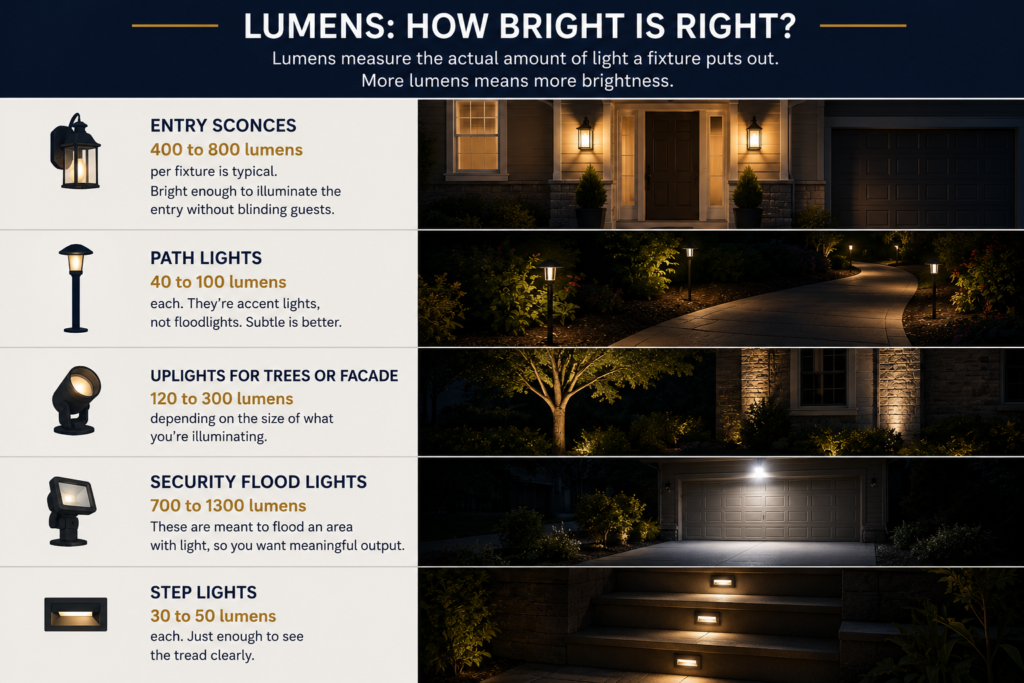
Lumens measure the actual amount of light a fixture puts out. More lumens means more brightness. Here’s a practical guide for exterior applications:
• Entry sconces: 400 to 800 lumens per fixture is typical. Bright enough to illuminate the entry without blinding guests.
• Path lights: 40 to 100 lumens each. They’re accent lights, not floodlights. Subtle is better.
• Uplights for trees or facade: 120 to 300 lumens, depending on the size of what you’re illuminating.
• Security flood lights: 700 to 1300 lumens. These are meant to flood an area with light, so you want meaningful output.
• Step lights: 30 to 50 lumens each. Just enough to see the tread clearly.
Rule of thumb: When in doubt, go with less. Overlighting an exterior is harder to fix than underlighting it. You can always add a fixture; removing one means patching a hole in your wall or siding.
Fixture Finish: Match Everything

The finish of your exterior light fixtures — matte black, aged bronze, brushed nickel, antique brass — should match your door hardware, house numbers, and any visible exterior metal. This sounds like a small detail. It’s not.
When the finishes are consistent, the exterior looks curated. When they’re mixed — bronze sconces, chrome door handle, black house numbers — it looks like the house was furnished piece by piece over years without anyone thinking about the whole picture.
Matte black has dominated exterior finishes for the last several years and it makes sense: it works with almost every home color, it photographs well, it reads as modern and intentional without being trendy. Aged bronze is a close second, especially on craftsman or traditional homes. Brushed nickel is better suited for interiors — it can look thin and cheap on exterior applications.
4.What Does Exterior Home Lighting Actually Cost?

Let’s talk real numbers. Here’s what you can expect to spend on exterior lighting in the U.S. in 2025 — from DIY installs to hiring an electrician for a full lighting plan.
Exterior Home Lighting — Cost Breakdown
| Project | DIY Cost | Professionally Installed |
| Replace 2 entry sconces | $80–$300 | $200–$600 |
| Path lighting (8–10 lights) | $120–$400 | $400–$900 |
| Uplighting (4–6 trees/features) | $180–$600 | $600–$1,500 |
| Garage sconces (pair) | $80–$280 | $200–$550 |
| Motion flood lights (2) | $60–$180 | $180–$450 |
| Step lights (4–6 steps) | $120–$350 | $400–$800 |
| Full front exterior package | $400–$1,200 | $1,500–$4,000 |
A few things that drive costs up: running new wiring from your electrical panel (adds $300 to $800 per circuit depending on distance and local electrician rates), coastal labor markets (Los Angeles, Seattle, Miami, New York all run 25 to 40 percent above national average), and premium fixture brands like Kichler, Progress Lighting, and Hinkley.
A few things that bring costs down: choosing solar for path and accent lights (no wiring needed), low-voltage landscape lighting systems that run off a single transformer (DIY-friendly and safe to install yourself), and buying fixtures through online retailers like Build.com or Ferguson Bath rather than big box stores.
Budget sweet spot: Most homeowners can do a complete front exterior lighting refresh — new entry sconces, path lights, and one or two uplights — for $400 to $800 in materials doing it themselves. That’s one of the best investment-to-impact ratios in all of home improvement.
5.How to Install Exterior Lighting — What’s DIY and What’s Not
Not all exterior lighting projects are equal. Some you can absolutely do yourself in an afternoon. Others genuinely require a licensed electrician. Here’s how to think about it.
Safe for DIY
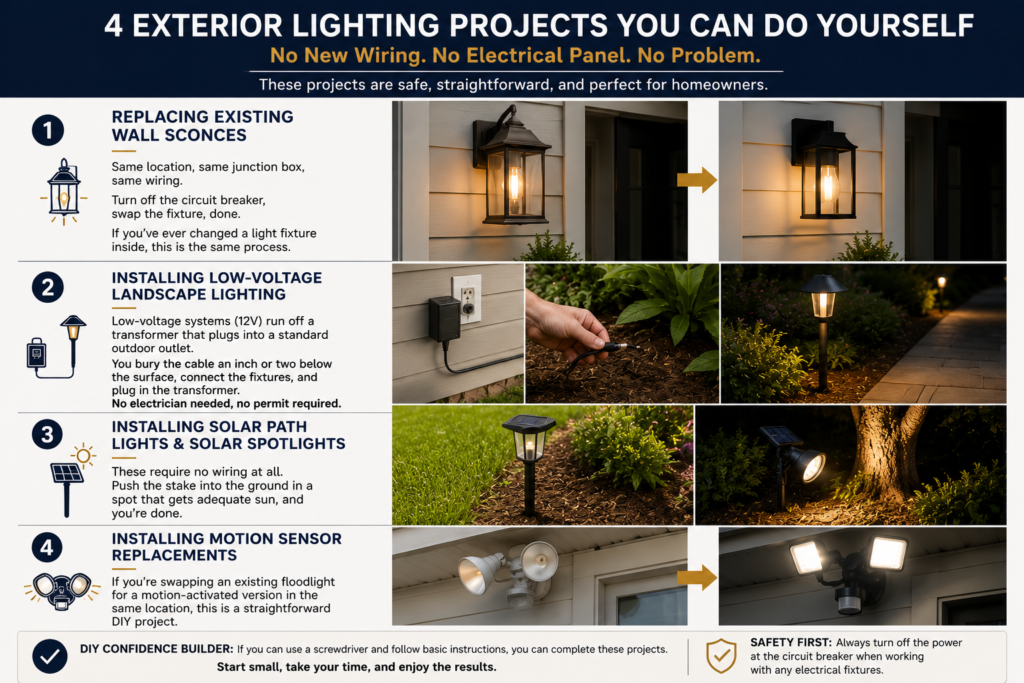
These projects don’t require running new wiring or working inside your electrical panel:
1. Replacing existing wall sconces — Same location, same junction box, same wiring. Turn off the circuit breaker, swap the fixture, done. If you’ve ever changed a light fixture inside, this is the same process.
2. Installing low-voltage landscape lighting — Low-voltage systems (12V) run off a transformer that plugs into a standard outdoor outlet. You bury the cable an inch or two below the surface, connect the fixtures, and plug in the transformer. No electrician needed, no permit required.
3. Installing solar path lights and solar spotlights — These require no wiring at all. Push the stake into the ground in a spot that gets adequate sun, and you’re done.
4. Installing motion sensor replacements — If you’re swapping an existing floodlight for a motion-activated version in the same location, this is a straightforward DIY project.
Call a Licensed Electrician

These projects require permits and professional work in most U.S. states:
1. Adding new circuits or outlets — If you want landscape lighting in an area that doesn’t currently have an outdoor outlet nearby, a licensed electrician needs to run new wiring.
2. Installing hardwired step lights in existing masonry or concrete — Cutting into existing structures and running conduit is not a DIY project.
3. Adding new GFCI outlets for transformer plugs — This is quick for an electrician (an hour or two), but it’s wiring work that requires a licensed pro in most jurisdictions.
4. Any work in your electrical panel — Full stop. Never.
Quick check: Before starting any electrical project, check with your local building department about permit requirements. Most simple fixture replacements don’t require permits. New wiring usually does. The permit process exists to protect you — a licensed inspection catches problems before they become fires.
The Transformer: Your Starting Point for Landscape Lighting

If you’re planning a low-voltage landscape lighting system — the most common DIY exterior lighting upgrade — your starting point is the transformer. This box mounts near an outdoor GFCI outlet, plugs in, and converts standard 120V household current to safe 12V.
Transformers are rated by wattage. Add up the wattage of all the fixtures you plan to connect, then buy a transformer rated at least 20 to 30 percent above that number. So if your fixtures total 120 watts, buy a 150 or 200-watt transformer. Most quality transformers (Kichler, VOLT, Hampton Bay) include a built-in timer and photo sensor so your lights come on automatically at dusk and shut off at a set time.
6.Matching Exterior Lighting to Your Home’s Architecture
The right fixture for a craftsman home exterior looks completely wrong on a modern home exterior. Getting the style match right is as important as getting the brightness right. Here’s how to approach it by home style.
Craftsman Home Exterior Lighting
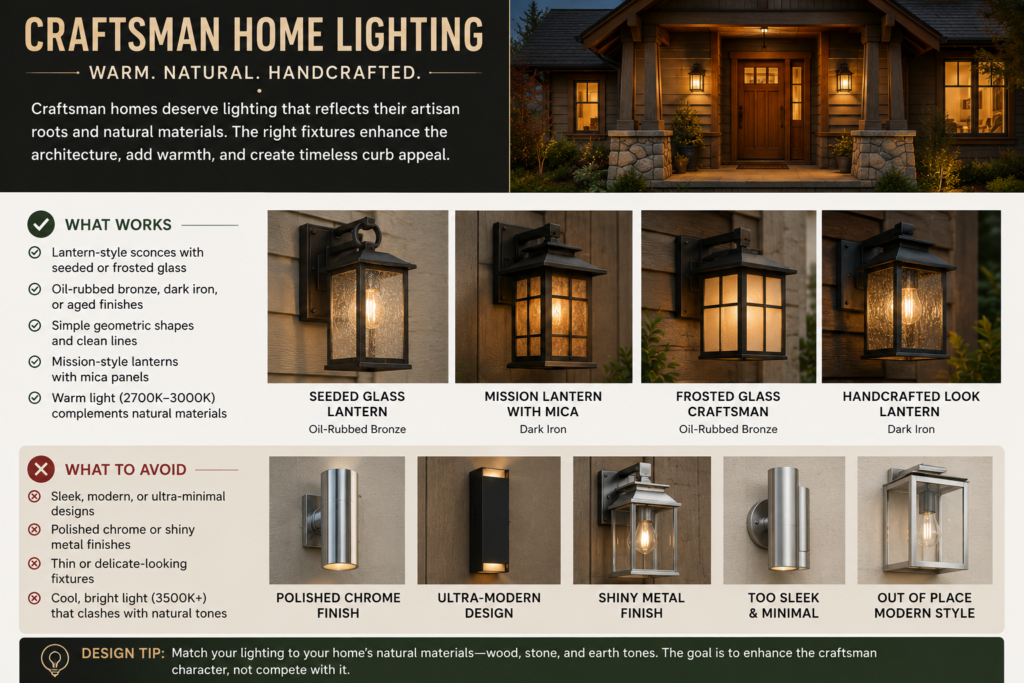
Craftsman homes call for fixtures with warm, natural materials and handcrafted character. Look for lantern-style sconces with seeded or frosted glass panels, oil-rubbed bronze or dark iron finishes, and simple geometric frames. Mission-style lanterns with mica panels are a classic choice. Avoid anything too sleek or polished — it reads as out of place against the natural wood and stone that define craftsman homes.
Modern Home Exterior Lighting
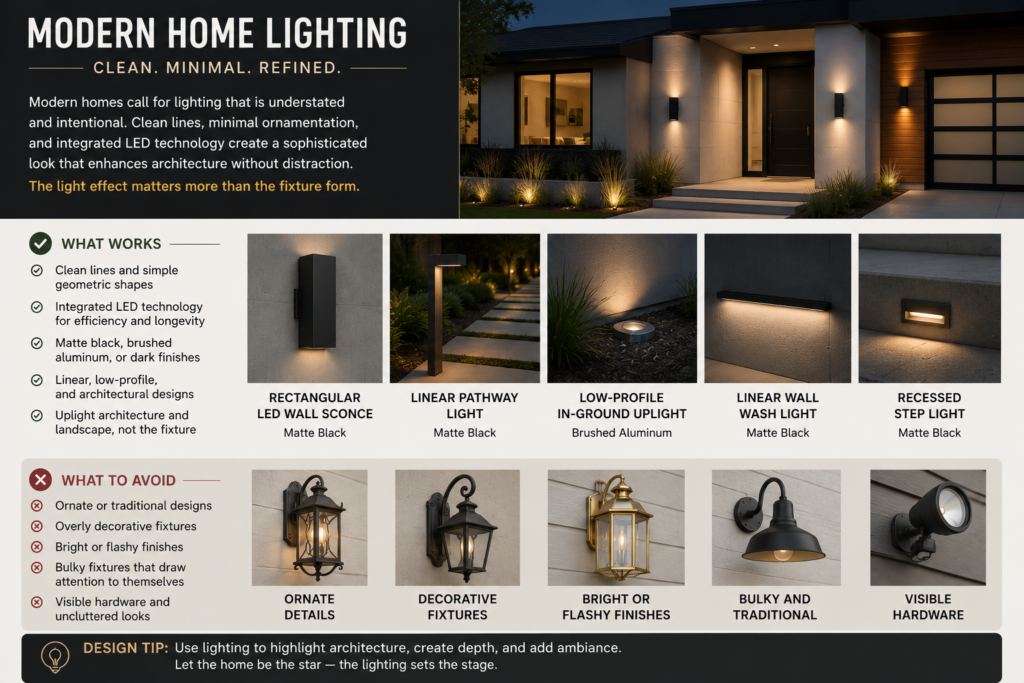
Modern homes want clean lines and minimal ornamentation in their fixtures. Rectangular LED wall sconces, linear pathway lights, and low-profile in-ground uplights all work beautifully on modern exteriors. Matte black and brushed aluminum finishes suit the aesthetic. The fixture itself should almost disappear — on a modern home, the light effect matters more than the fixture form.
Gray Home Exterior Lighting

Gray is one of the most versatile home exterior colors in the U.S. right now, and almost any fixture finish works with it. Matte black against a light to medium gray reads as sharp and contemporary. Aged bronze against a deep charcoal gray reads as warm and sophisticated. If your gray home exterior has warm undertones (taupe-gray), lean toward bronze finishes. If it reads as cool (blue-gray), matte black or brushed nickel is the better choice.
Farmhouse and Traditional Exterior Lighting
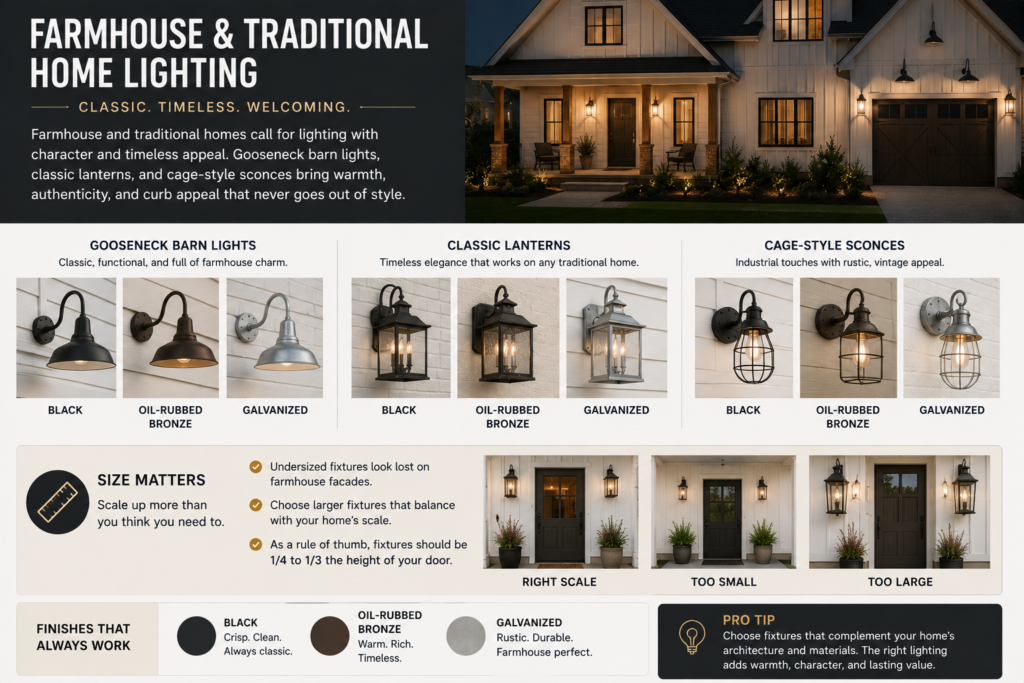
Farmhouse and traditional homes suit gooseneck barn lights, classic lanterns, and cage-style sconces. These styles come in black, oil-rubbed bronze, and galvanized finishes — all of which look at home on board-and-batten siding and painted brick. Scale up more than you think you need to on these styles; undersized fixtures look lost against the broad, simple facades of farmhouse homes.